Pages

Monday, January 30, 2017

#GDP071 in 3D - Collapsing Flowerpot

Hello again, I was so tempted by the 3D challenge over at the Global Design Project this week, that I have just managed to complete & squeeze in another project.  I also used the colours from the new Color INKspiration Challenge #02 (there is more detail on Color INKspiration down below):-

H2 Designs | 3D Collapsing Flowerpot with Home Sweet Home dies for #GDP071 & Color INKspiration #02

This little project was inspired by a pop up pot card die from Karen Burniston.  I thought that I could create something similiar using the SU Home Sweet Home dies.  I did manage to create a pop up pot, which I filled with flowers & foliage, then layered onto a circular doily shape.  The pot can be "flattened" for transport.  

There were lots of construction issues I had to overcome, the first being that the Home Sweet Home die creates a rectangular house, not a square one.  I solved this by folding my cardstock in two & layering the fold line on a score line in the die to create one piece with two house fronts.  I repeated this to make the remaining two panels.  The lattice grid inside the house which supports all the foliage was trimmed down from several pieces of house fronts & then locked together inside the top of the pot (see bottom left picture).  The pot is held to the base by two tabs that I cut into the white base piece & then attached up inside the pot with strong tape (top right picture).  If you have ever made a pop up before, you may have discovered that is doesn't sit flat, that is because you might have a folded piece of cardstock inside another piece of folded cardstock, which causes buckling.  To get everything sitting flat, you should only have one folded layer, then any other layers need to be split, so they butt together when the project is open (you can see the splits in the scallop & mint circles in the top right picture).

I had a lot of fun & a great sense of satisfaction working out how to create this project, but I definitely don't need to make another one anytime soon, lol.

Thank you to everyone at GDP for inspiring me to create another 3D project.  You can find all the DT & gallery projects by clicking on the icon below:-


Here are the challenge colours for the Color INKspiration challenge:-


This is a new challenge that is run on Facebook, so you don't need to have a blog to join in the fun! The very talented Bronwyn Eastley is the creator of this new challenge & you can find out more about Challenge #02 on her blog here.

I must say I was VERY challenged with these colours - I love Soft Sky & Mint Macaron, but Garden Green & Wisteria Wonder don't even get a mention on my "go to" list.  I love the outcome of these colours, with the blues & greens mingling in the foliage with nice crisp white flowers.  

Thanks to both Teams for your fun challenges & thanks for stopping by!  :)

PS You can see my first #GDP071 entry here.


Project Components
All Stampin' Up! (some retired)

Wednesday, January 25, 2017

#GDP071 in 3D - Home Sweet Home


Hithere!

It's been a very long time since I have participated in a challenge but the AMAZING team of crafters at the Global Design Project certainly enticed me with their current theme challenge of 3D & Off the Page.  :)

A friend is about to move into a new home after many years at her current residence, so I thought I would make her a little 3D house to celebrate her move:-

H2 Designs | Home Sweet Home Dies & Sweet Home Stamps

There was certainly a bit of paper engineering involved to work out how to create the solid side walls under the angled roof of the house, while still enabling the house to squish flat to fit inside the envelope! I based the structure on a "shadowbox" or "diorama" style card, but played around with it to get everything happening the way I envisioned.

I think I might christen this a "pull, push & pop" card, lol. You pull the sides to flatten it for mailing, then push the sides in to pop it out into a 3D shape for display.

I layered a stitched oval die-cut on a red scalloped oval on the back of the house to add a spot to write a message.  As well as the Home Sweet Homes dies, I used the cloud dies from the new Up & Away Thinlits to create the bushes, which are attached to the house & fences with dimensionals to create extra depth.  The fence palings are made from the Classic Label Punch which have been stamped with the linear image from Gorgeous Grunge.  The window openings have been die-cut, then backed with Vellum.  The roof was scored every 1/8 inch to emulate metal & the door was stamped with a mix of VersaMark & Real Red ink & then embossed with clear powder to give a glossy finish.

Thanks to everyone at GDP for a fun challenge & thanks for stopping by!  


Project Components
All Stampin' Up!
As listed above, plus
Real Red, Pool Party, Old Olive, Crumb Cake & Thick Whisper White cardstock,
Pool Party ink, Tear n Tape, Pearl


Edited to Add:
Thank you to the Team at GDP for choosing this project among the winners for this week.  :)


You can see a second project I made for this challenge here.


PS  If you are interested, you can find a tealight holder I made with the Home Sweet Home dies here.

Tuesday, January 10, 2017

Hey, Chick - a Sale-A-Bration set from Stampin' Up!

Who doesn't love cute critter stamps?  :)

The new Hey, Chick set from SU has 3 adorable chooks, plus an "about to be hatched" chick.  Here is one of the girls on a cardstock envelope that I made to hold a gift certificate:-

H2Designs | Hey Chick, Window Shopping & Hexagons Dynamic Textured Impressions Embossing Folder

The chook has been stamped on watercolour paper with Basic Black ink, then coloured with an aquapainter & Basic Grey & Smoky Slate inks.  Her comb has been coloured with a Real Red marker, & her feet & beak with a Pumpkin Pie marker.

The white embossed sentiment comes from the new Window Shopping stamp set.

The envelope was made to the required size using the Envelope Punch Board & has been randomly stamped with the splotches from Going Grunge.  Then I created the wire pattern by using the Hexagons Dynamic Textured Impressions Embossing Folder as a "stamp" with VersaMark ink, which was then heat embossed with Silver.

Thanks for stopping by!  :)

Project Components
All Stampin' Up! (as listed above) plus
Going Grey, Real Red & Vellum cardstock plus retired Red Baker's Twine.

Tuesday, August 30, 2016

I ♥ The Jar of Love!

My favourite bundle in the 2016-17 Annual Catty would have to be the Jar of Love stamp set & the matching Everyday Jar Framelit Dies.  Here they are in action with a small tag from the Tags & Labels Framelit Dies:-


There are so many possibilities with this set. ♥

Thanks for stopping by.  :)

Card Components
(All Stampin' Up!)
Crumb Cake & Whisper White Cardstock
Soft Sky, Blushing Bride, Flirty Flamingo, Wisteria Wonder, Pear Pizzazz, 
Crumb Cake & VersaMark inks
Pool Party Embossing Powder (retired)
Jar of Love & Gorgeous Grunge Stamp Sets
Everyday Jar plus Tags & Labels Framelit Dies
Linen Thread
Dimensionals & Glue Dots

Friday, August 12, 2016

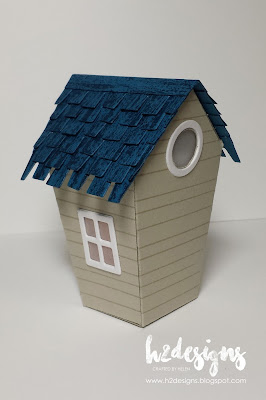
Home Sweet Home Tealight Holder for The Paper Players

It's been ages since I have posted anything, so I thought I would join in the challenge at The Paper Players this week where Joanne has suggested a project with a light source.  Seeing as I have some fun new products from Stampin' Up!, I thought I would take the challenge literally & include an actual light inside my project:-


These Home Sweet Home Thinlits Die & the matching Sweet Home Stamp Set are adorable, but they are tiny.  Here is a size comparison with a re-inker bottle:-


Seeing as the house isn't big enough to accommodate a standard size tealight in the base of the box, I suspended a panel in the attic to hold the tealight in upside down:-


ETA:  You can find the dimensions of the tealight panel in the comments!  :)

Here it is without the tealight inside:-


I placed some vellum behind the circular window on the back door, but only adhered it above the window.  This way you can put your fingertip into the hole to grip & open the door, but the vellum drops back in place to filter the light & obscure the tealight base.  Here is the back panel closed:-


I inked the front door stamp with VersaMark ink & then Dapper Denim ink so that I could clear emboss it to get a nice, glossy finish.  I added a pearl door knob.  All the white trims are double layers to give extra definition:-


The roof shingles have been cut from Dapper Denim & then inked with an image from the Timeless Textures Stamp Set to give it a bit of interest.  I added a strip of "capping" over the top point of the roof to get a neat finish:-


I can see I will be making lots more of these cute little abodes!  :)

If you would like to see all the fabulous projects the Design Team at the Paper Players have for this challenge, as well as the other entrants in the gallery, click on the image below:-


Thanks for stopping by!  :)

Project Components
All Stampin' Up!
plus a tealight

Friday, June 24, 2016

Celebrating with The Paper Players - SU Sweet Cupcake!

I couldn't let this week's challenge at The Paper Players pass by without partcipating!  The Team are celebrating their 300th Challenge!  Woohoo!

I was very honoured to be part of The Paper Players Design Team way back in 2012 & loved working with this talented & fabulous group.  :)

This week to celebrate this awesome milestone, Jaydee is hosting a "Clean & Simple Celebration" themed challenge.  Here is my project:-


I have used the fun, new, photo-realistic Sweet Cupcake stamp set & matching dies.  I have kept the card very clean with an all white background, broken up with some embossed texture. Dazzling Diamonds have been added to the frosting with VersaMark & Heat & Stick Powder for some sparkle.

You can check out the Design Team's projects, as well as the other gallery entrants here (simply click on the image below):-


Thanks for stopping by!  :)

Sunday, May 29, 2016

CASE-ing the Catty #80 - Farewell!

Hello & welcome to this week's CASE-ing the Catty's Blog Hop!

Each week the Crew members will take inspiration from a section or theme of the current Stampin' Up Catalogues to create their projects.  The acronym "CASE" stands for "Copy And Share Everything" or "Copy And Selectively Edit".

This week the CTC Crew are saying farewell to a favourite product that is about to retire. 

I am also saying farewell to the fabulous Design Team at CASE-ing the Catty....  Thank you to everyone at CTC (both past & present), it has been wonderful working with you! ♥

There are lots of wonderful products retiring from both the SU Annual & Occasions Catalogues, but don't be sad, that just means there are heaps of wonderful new goodies in the upcoming 2016-17 Annual Catalogue.  Yay!  :)

I have chosen to say goodbye to lots of retiring products to create my project:-


I really like the steel rule dies & am sad to see them leaving the Catty altogether.  I have used the Fry Box to house my flowers, which feature foliage from the Bouquet Bigz L Die:-


The blossoms are made from 2 layers each from the 1.1/4" & 7/8" scallop circle punches (cut from Pumpkin Pie & Peekaboo Peach cardstock), misted with alcohol, scrunched & held together with mini silver split pins.  The small flowers are punched from one of the Itty Bitty Accents punches, finished off with a Pumpkin Pie candy dot.  The sentiment comes from one of my favourite sets, All Boxed Up, & is on a piece die-cut with a Handpicked Framelit.

The ribbon is a piece of Delightful Dijon Dotted Lace Trim which has been dyed with Black Staz On ink, giving it a lovely, deep Bronze/Olive colour:-


To support all the flowers & foliage, I die-cut two pieces of window sheet the same size as the rear panel of the box, trimming them to two different heights & secured them inside the box (the same way you would construct a "card in the box").

To work your way around the Hop & see lots of inspiration from our fabulous Team members, simply click on the "Next Blog" & "Previous Blog" buttons below.  (Go forward to see Bronwyn's goodbye project or backwards to see Rachel's farewell to Summer Silhouettes.)


Should you get lost along the way, you can find the entire list of participants on the CASE-ing the Catty blog post:-


If you are feeling inspired, we would love you to share a new project showcasing retiring product(s).  Simply link it up in the gallery on the CTC post (click on the icon below).  At the end of each month, the Crew will choose a Winner.


Thanks for stopping by!  :)